

For many small businesses and IT teams, cybersecurity starts with securing how users connect to internal systems. One of the simplest ways to improve remote access security is by using a VPN (Virtual Private Network).
Although many IT administrators are familiar with this process, and many firewalls or routers come with built-in VPN server capabilities (such as a Cisco Firewall with its Cisco VPN client), you can also set up a basic VPN server on Windows Server 2016 or 2022. This allows you to connect to an isolated system, provided you have control over the firewall. For example, you can use this to create a secure connection from the office to your home PC, avoiding an RDP (Remote Desktop Protocol) session over the open internet.
Why Use a VPN Instead of Opening RDP Ports?
While modern remote desktop implementations are encrypted, leaving the RDP port open to the internet is not ideal for minimizing your security footprint. Using a VPN is a better practice.
A VPN adds a layer of email and network protection, allowing only trusted users to securely access your environment. It also reduces your exposure to email spoofing, domain spoofing, and other cybersecurity risks linked to exposed services.
Alternatively, you can limit exposure by configuring firewall rules to allow RDP access only from trusted IP addresses, but a VPN remains the more secure and flexible solution, especially for growing teams or remote access needs.
Who Should Use This?
Those who could benefit most from this setup are users who rent virtual machines from third-party VPS providers and want to avoid exposing those machines on standard RDP ports.
This VPN setup is also highly recommended for:
- MSPs managing Windows servers in cloud or virtual environments
- Businesses that want to reduce risk by not exposing RDP ports to the public internet
- Users who need secure remote access from home or satellite offices
- Organizations focused on improving cybersecurity, email security and protection against phishing or spoofing
Using a VPN helps reduce your attack surface and supports a stronger, more layered approach to cybersecurity.
Server Side: Setting Up the VPN Connector
Before setting up the VPN, make sure any physical firewall (like a router or hardware firewall) allows PPTP passthrough:
- Port 1723 must be open
- GRE Protocol 47 must be allowed (note: this is a protocol, not a port)
These should be open and routed to the machine you want to connect to.
Assuming the firewall is properly configured, here’s how you setup the VPN on your Windows server (this example uses a Windows Server 2008):
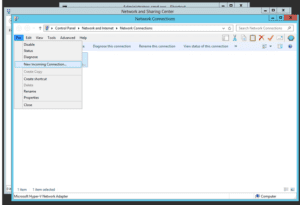
- Go to Control Panel > Network > Network and Sharing Center
- Click on “Change Adapter Settings”

Once you are in the “Change Adapter Settings” page, press Alt-F to bring up the “FILE” menu, since in some cases this menu may be hidden by default.
You should see a menu pop-up. Click on “New Incoming Connection”.
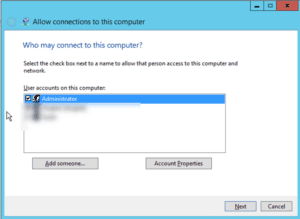
A new window will appear named “Allow connections to this computer”. On modern Windows Server, no user will be selected by default. On older versions of Windows Server, the administrator user will be selected.
In our case we just want to do VPN for RDP access, so we select “administrator”.
Click Next to continue.
Another pop-up appears. The system asks: “How will people connect?”
Through the internet of course! Click Next.

On the next pane, you will be asked to allow access. From this pane, select IPv4 or IPv6 (whichever you use) and click “Properties”.
Before clicking “Allow Access”, you can configure how IP addresses are assigned to VPN clients. When someone connects to this computer, they will receive a dynamic IP address from the pool you allocate. This is a private network linking only the VPN Server and any other machine connected to it.
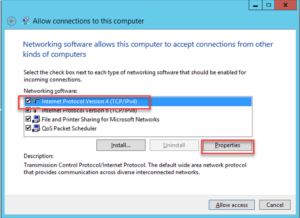
You can simply leave the defaults and just click “Allow Access” immediately. The machine will grab an available IP on the local LAN then to assign to the workstation that will be connecting to your server.
(Optional) Configure the IP Range for VPN Clients
If you click “Properties”, a window opens where you can define a custom IP address range.
This is where you specify what range of IPs you want to allocate to systems that connect to this machine. It’s a good idea that this doesn’t conflict with any IP ranges used internally. In this case, we put in 192.168.10.10 through 192.168.10.15. The VPN server itself (the target machine) will automatically bind to the first IP (192.168.10.10) so your first machine that connects to it should get 192.168.10.11.
Once you click “OK”, you will see the “Allow Access” pane again.
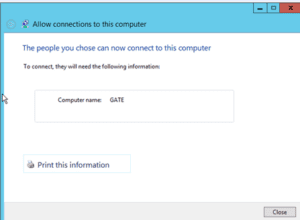
Just click “Allow Access”. You will now see a confirmation like this; in which case, you’re done. In principle, the machine should automatically open the necessary ports. In this case, we want the PPTP port (1723) open.
Click Close to complete the setup.
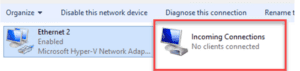
You should now see a new adapter labeled “Incoming Connections”. This means the system is ready to accept VPN connections.
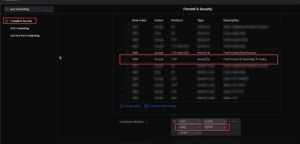
If you go to the windows firewall, the operating system should have automatically opened for you the PPTP-in port already (TCP: 1723) and GRE-in (GRE:47).
![]()
These allow VPN connections through your firewall. If you don’t see these enabled, you can manually allow them via the Windows Defender Firewall > Inbound Rules section.
At this point, you’re done with the receiving machine.
You may need to reboot it or restart the Remote Desktop service if you want it to bind to this.
What if My Server Is Behind a Physical Firewall?
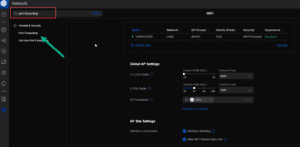
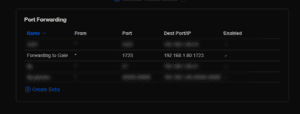
If your VPN server is behind a physical firewall or router, like in this case—a Unifi SOHO router—you’ll need to manually forward the required VPN ports to the Windows Server.
You will need to create a port forwarding rule to the server in question on Port 1723 TCP inbound. And, also allow both PPTP and GRE inbound.
In the Unifi controller interface:
Go to the configuration (the gear icon bottom left) and search for “Port Forwarding”. Then click on the option.
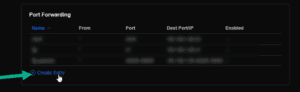
Create a new Port Forwarding Entry …
Add the server information including the port and the IP address of the server of your LAN
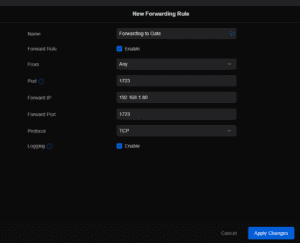
Click “Apply Changes”
You’ll see the new rule listed in your Port Forwarding table.
Double-Check the Firewall Settings
Under your firewall settings, double-check that PPTP and GRE are allowed globally. If both are allowed, you should be good to go.
On the Client Machine
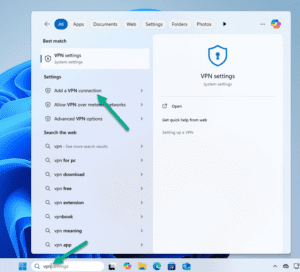
Let’s now set up the connection from a Windows 10 or Windows 11 client (in the example below, it’s windows 11).
In the windows search bar, type VPN and select “Add a VPN Connection”.
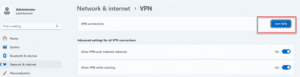
Click on [Add VPN]
At the Add a VPN Connection Panel, fill in the required information.
In this case, we are connecting to the public domain name of our network on the internet.
When your firewall is properly configured, it should route VPN traffic to the backend server you’ve set up.
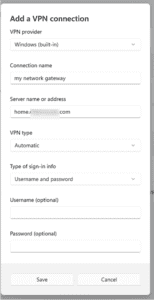
Click Save. The VPN connection will now appear in your list of available networks.
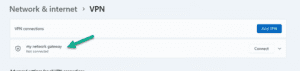
Connecting to the VPN
From your main windows screen on the client machine, click the network icon (bottom right) and then click on “VPN” in the pop-up. Next, click “Connect”.
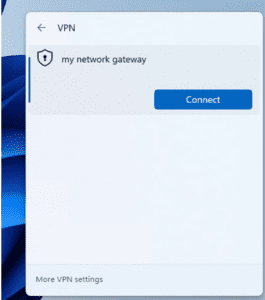
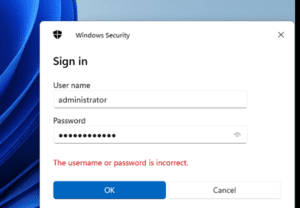
The system will prompt you for credentials:
Enter the username and password for the Windows Server user you enabled earlier (e.g., Administrator).
And we’re connected!
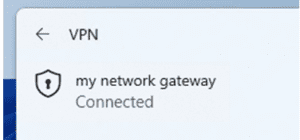
From this point on, we should be able to RDP to the server itself fine using the private IP (in this case, 192.168.1.80) and go from there.
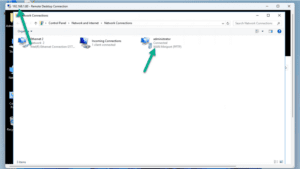
In the example, we used remote desktop to connect to the server using the local LAN address (even though I’m connected from outside the network).
You can see in the screenshot from the server side that administrator is connected over the Wan Miniport (PPTP) so we are tunneled via VPN over PPTP.
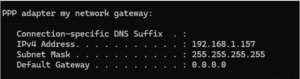
In fact, on my workstation I’m connecting VPN FROM, I was allocated an IP in the same local network:
Why Go Through All These Hoops?
Exposing the Remote Desktop Protocol (RDP) port (typically 3389) to the public internet is unsafe because:
- Vulnerability to Brute Force Attacks: RDP is a common target for automated attacks attempting to guess usernames and passwords, especially if weak credentials are used.
- Exploitable Vulnerabilities: RDP has had multiple security flaws (e.g., BlueKeep, CVE-2019-0708) that allow unauthenticated remote code execution if unpatched systems are exposed.
- Lack of Encryption by Default: Older RDP versions may not enforce strong encryption, exposing sensitive data to interception.
- Credential Theft: Attackers can use phishing or malware to steal credentials, gaining direct access to exposed RDP servers.
- Botnet and Ransomware Risks: Compromised RDP servers are often used to spread malware, mine cryptocurrency, or deploy ransomware.
Using a VPN for RDP is safer because it:
- Hides the RDP port from the public internet, reducing exposure to cyber attacks.
- Encrypts data with strong protocols, protecting sensitive information.
- Limits access to authorized users, minimizing the attack surface.
Connecting VPN Security with Broader Cybersecurity Practices
Setting up a VPN is an important step in reducing exposure to remote access threats. But for a well-rounded security posture, it’s also important to address risks that VPNs don’t cover, especially those related to email security.
Attacks like phishing, email spoofing, and malware delivery often bypass network-level protections. This is where solutions such as DMARC enforcement, email authentication, and inbound email filtering become critical.
Vircom supports MSPs and IT teams in adding these layers of protection with tools like OnDMARC for domain authentication and Proofpoint Essentials for phishing and malware protection. These solutions help reduce risk by identifying and blocking threats before they reach users.
By combining secure access with strong email protection, organizations can strengthen their overall cybersecurity strategy without adding complexity.


